Replacing CIS injectors on my 450SLC
This week I replaced the CIS injectors and the spark plugs in my 450SLC and the car is running much better for it.
I’ve been thinking about swapping the fuel injectors in the SLC for a while now. When cold, the car wouldn’t run that well at first and you would need to blip the throttle a few times to get the idle to settle down. This can be a sign that some of the injectors are not atomizing the fuel properly. The car is less sensitive to this as it warms up, but proper atomization is important for smooth running and good power. A really bad injector can also reduce engine life if it is squirting too much fuel and washing down the cylinder walls.
I was spurred on after I got the car out of storage post COVID19 lock down. The car was really cantankerous when starting, almost stalling and not running properly and then it would eventually settle down to run on 7 cylinders. My theory was that not being driven properly for 2-3 months had made this even worse and that it was fouling the spark plugs.
My other thought was that it was a good time to change them while they are still relatively inexpensive. The parts are still available, but for how long? D-Jet injectors are no longer available and the holders are no longer available for CIS-E injectors for the M104 engine.
There are three parts needed when replacing the injectors. The CIS Injectors themselves, the seals and the holders. It is not strictly necessary to replace the holders, but they are usually in poor shape once the injectors need changing. Mine definitely needed changing.
Replacing the CIS injectors is not difficult, just a little fiddly. The injectors and their seals are held in by little metal tabs. I unscrewed the fuel line before removing the tab, otherwise the injector would just spin. My injectors were still snug in the holders, but could be removed without tools. I had to use pliers to remove the holders, but they all came out easily. I had to use a dental pick to remove the hard and brittle o-ring.
The picture above shows one of the injectors removed, but the holder still in the car. The injector on the left shows one with the locking tab still in place.
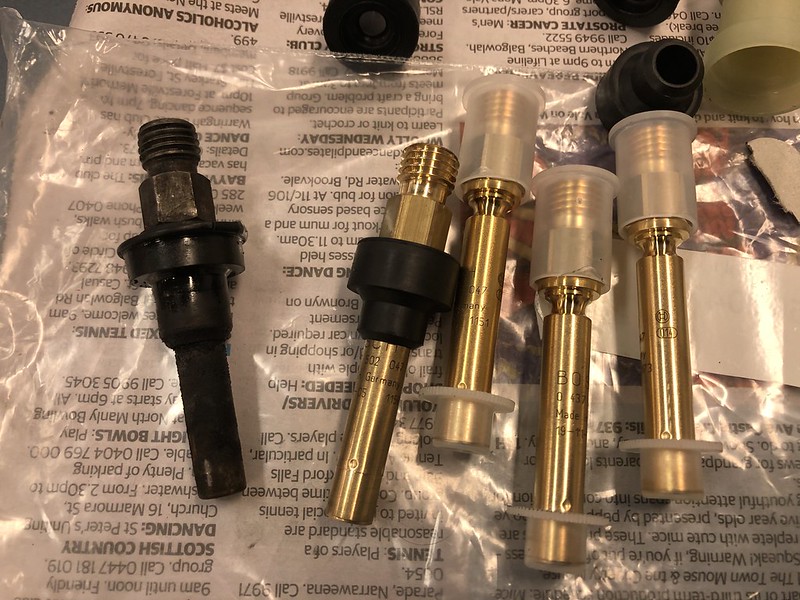
My injectors were absolutely filthy. I guess the seals were not working as well as they looked as the injector sides and holders were caked with grime. The contrast with the new injectors is stark.
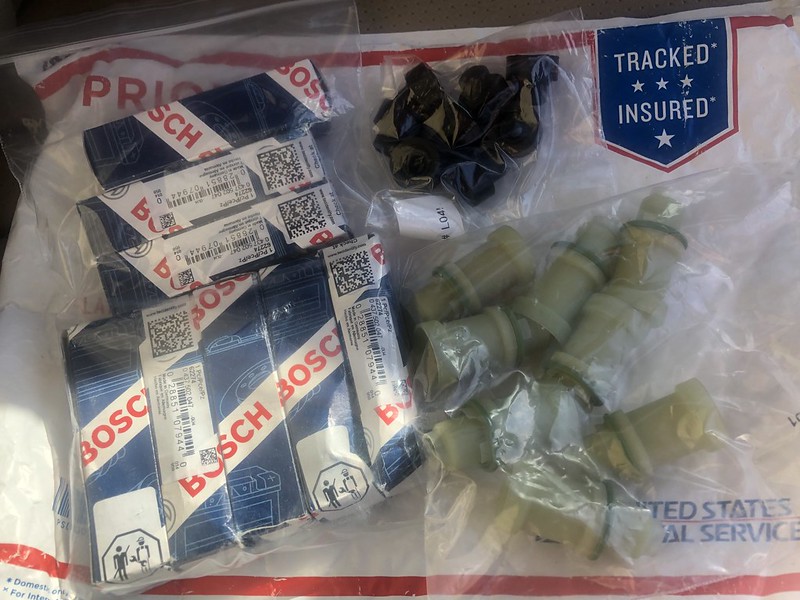
 The CIS injectors are still made in Germany by Bosch. It is a pleasant surprise that they haven’t been sent offshore. Before the new injectors can be fitted, the seal must be pushed onto each injector. The new seals are quite tight and it can take a few tries to get the seal on and pushed up to the end of the injector. The injector and seal then fits into the holder, and the whole assembly is held down by the tab.
I found cylinder 3, 4, 5 and 6 the most fiddly. On 3 and 4 there is the fuel lines and throttle linkage. I have heard that some need to remove it, but I didn’t. For 5 and 6 there is the pipe work for the fuel pressure regulator. I did my best to clean up the area before removing the injector, and the injector hole before putting in the new holders. They were pretty dirty on my car. The picture below shows the state of the holders after removal.
As the injectors are held on with hard lines, I had to be careful not to kink them. The hard lines mean the CIS engines are not as susceptible to engine fires as D-Jetronic. It took me a couple of hours to do all eight. After I had done the first four, I had to move the car briefly. it ran even worse with four new and four old injectors. It is definitely worth replacing all the injectors at the same time.
After I had finished replacing the CIS injectors, the next step was the spark plugs. I had forgotten how little room there is to work on the 107 chassis. The 107 is basically a 114 chassis with a prettier body. That means room is tight with the M117 V8. Much tighter than the W126 and its cavernous engine bay. A simple job to replace spark plugs is a pain on the 107. The four rear cylinders being the worst. It is easier to move the coolant expansion tank out of the way of the left hand side. It may be easier to remove the battery on the right hand side, but i was able to get my hand in.
Having a ratchet with a hinged handle helped get into those last four. I like to do most of the tightening by hand to make sure I don’t cross thread the plug, and only use the ratchet for the initial loosening and final snugging up.
The plugs on 1-4 were worse, and I think #2 was the cylinder that wasn’t firing at all. That plug had a lot of fuel and gunk clogging it up. I also noticed I had some strange non-standard suppressors on 2, 3 and 4 that I will need to replace.
During the plug change I dropped one of the plugs and could not find it. I had purchased a cheap boroscope on Amazon a few weeks ago, so that was a good test to find the plug. While i was at it, I had a look inside the cylinders. You can still see the factory cross-hatching on the walls, and other than some carbon build up on the pistons, the engine looks in great shape for 300,000 km.
Finally I was ready for my test drive. Initial start up was a bit choppy but once I got going there was a lot more power than before and the engine ran much better. I now had 8 cylinders again! The engine needs a fine tune, but my annual roadworthy is due later this month, so I will have that done when I got to get the pink slip. So far this looks like it has been a really worthwhile repair. I’ll soon be doing the same on my 560SEL as it needs a set of injectors too.


2 Responses
[…] next step was to replace the plugs. I had found these all fouled up on the 450SLC after I replaced those injectors. They were even worse on the 250SE. At least these plugs are much easier to swap out. […]
[…] a lot of fun even at the legal speed limit. It was also a good run for the 420SLC with its new injectors. That drive was pretty uneventful and we came back via the […]