W126 Monovalve eliminator – part 4
I have now completed the installation of the Movovalve elimination kit on my 560SEC. So far so good. Most importantly, I don’t have heat when I don’t want it, but it is available when needed. In the last installment, I completed the routing of the cooling hoses. From there I installed the radiator and ensured the cooling system didn’t have any leaks. The final step was to set up the vacuum solenoid so it could control the heater valve.
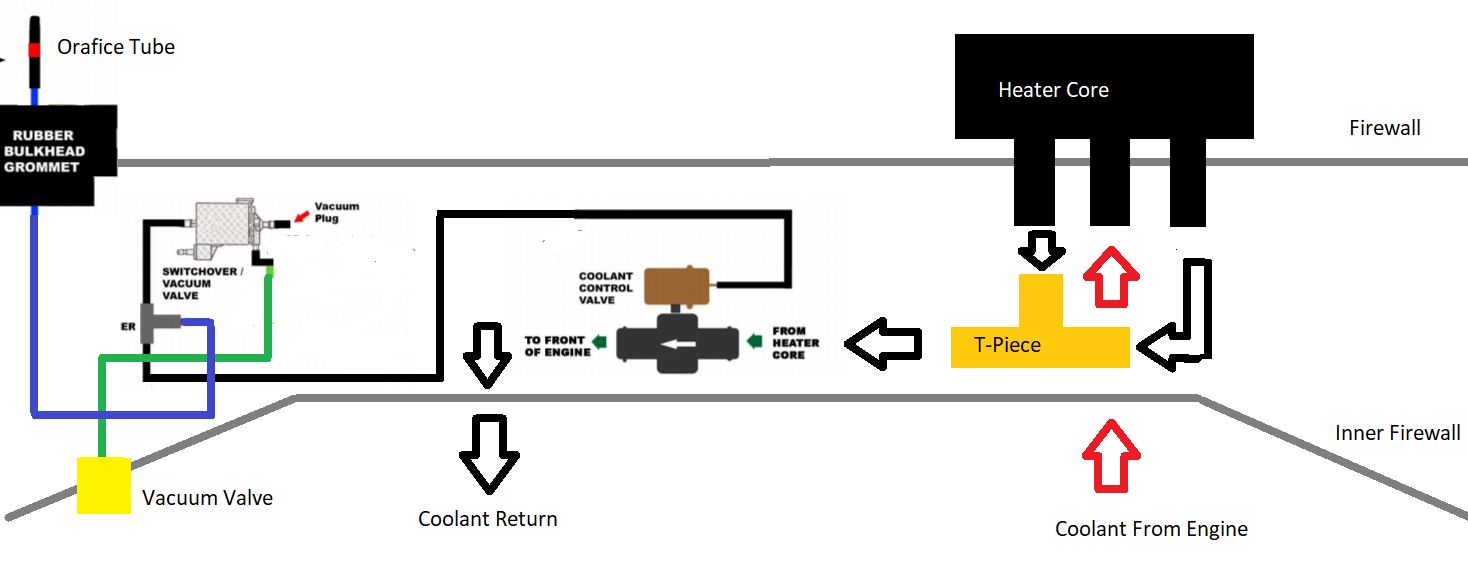
The very rough diagram below outlines how I adapted the kit for the W126. Note the diagram is not to scale and in reality the vacuum lines do not have 90 degree bends.

There are a number of differences between the W126 and W123. The two biggest are probably the inner firewall and multiple outputs for the heater core. I have covered the coolants lines previously. I also wanted to mount the vacuum solenoid inside the inner firewall. In the end I installed it where the monovalve used to reside. The movovalve elimination kit suggests putting a t-piece into the vacuum line for the climate control system. The W126 is a big different in that it has one way valves in the firewall for the passenger compartment vacuum consumers. Each vacuum valve provides 2-3 outputs for vacuum consumers. Instead of cutting one of my lines, I just replaced a valve with two outputs with a new valve that has three outputs. That way any vacuum leak should not affect other systems.
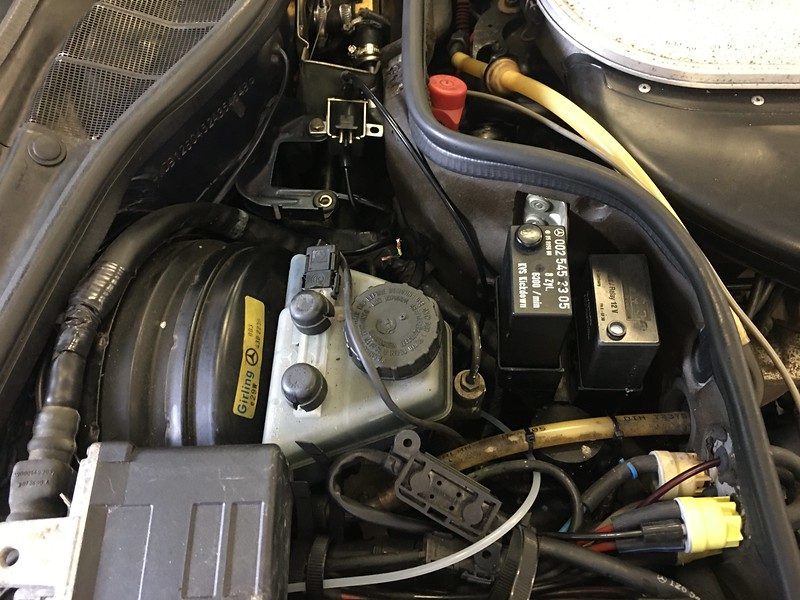
The photo below shows the new valve and the line I installed to the vacuum solenoid. It is the new looking valve at the top. The black vacuum hose connects to the solenoid located that the top centre of the photo.
Next step was to install the vacuum orifice line. This line is essential according to the supplied instructions. This is the clear line that can be seen in the bottom of the picture above. One end of this line has a tiny hole that lets a small amount of vacuum bleed out. This is poked through one of the firewall grommets. It then links into a T-piece between the solenoid and the vacuum valve. The diagram above shows how I have set it up. It is shown in blue although the line is actually clear.
I decided to take the car for a test drive. This had a surprising conclusion. I assumed that when the vacuum lines were connected to the vacuum solenoid without power, the valve would be closed. This is not the case. The valve is actually open. Still, it did prove that the valve works! Once I disconnected the vacuum I could see the valve close.
The final step was to install the electrical connection. The vacuum solenoid uses a more standard connection than the micro connection used by the monovalve. The movovalve elimination kit provides the proper Mercedes electrical connections. These require soldering. The combination of the available space, only having two arms and my lack of soldering skill made this quite difficult. I cheated and soldered the connections onto two short lengths of wire on the workbench and then crimped it to the wiring harness.
Back out for another test drive the car behaved exactly as it should. Driving around normally with the climate control set around 20C, I had no intermittent heat. Moving the temperature wheel to hot, and plenty of heat was available. I omitted the auxilliary water pump so I have probably compromised my heat when the car is idling for prolonged periods of time. However, I’ve never had any problem with any of the older models that do not have this feature in the warm Australian climate.
This installation has been more involved than I anticipated, but it would be much faster to do it again on another W126 V8. I could have done it much faster by just mounting the valve on the outside of the firewall, but I wanted to make it a neater job since I plan to keep the car. I also took the time to swap the radiator, coolant hoses, expansion tank, low pressure hoses, clean the cowl drains and install new seals and more.
Time will tell, but the Movovalve elimination kit seems like a good option for the W126. Especially when the only monovalve available is the MTC unit. I would also note that this installation was done in the way I decided to do it, and there are other simpler ways of doing it.


this is part 4 in a 4 part series:
https://www.classicjalopy.com/2020/09/w126-monovalve-eliminator-part-1/
https://www.classicjalopy.com/2020/09/w126-monovalve-eliminator-part-2/
https://www.classicjalopy.com/2020/09/w126-monovalve-eliminator-part-3/
Very interesting series of posts. Way above my skill level though! Let me know if you are thinking of moving the 560SEC on. Cheers Phil
No plans to sell the 560SEC.
The only one I may sell is the 300SE at some point.