Becker 1402 Operation Instructions
I am currently installing a Becker 1402 Grand Prix electronic in my 560SEC. I don’t have the original owners manual packet for the car, so I didn’t have an instruction guide. In any case, since my 560SEC is a UK version, it would have originally had a slightly different Becker that looks visually the same. There were a couple of buttons I wasn’t able to to identify, so I borrowed the instruction manual from a friend with a 1989 420SEL.
The Becker 1402 was standard on the W126 from 1988 in Australia (other than the 560) and at least some W124 models of the same era. It was visually very similar to the 754 used on the 1986-1987 models. The 560 used the CD player in Australia.
I’ve omitted the obvious such as the functions of the on button or volume.
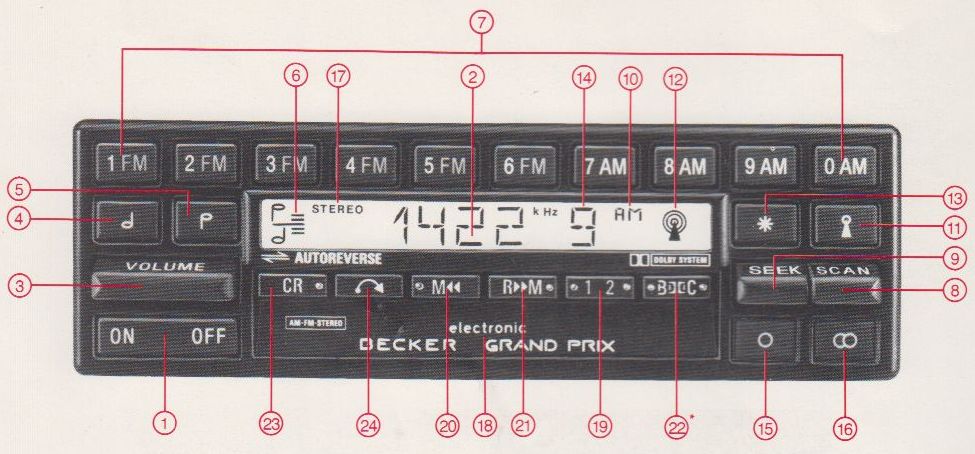
Becker 1402 buttons:

- On/Off
- Digital display
- Volume control
- Tone control, bass
- Tone control, treble
- Indication for tone control
- Wave band – and station recall keys
- Scan tuning bar
- Seek tuning bar
- Wave band indicator
- Sensitivity switch
- Indicator for sensitivity switch
- Function control key
- Indication for pressed station recall key
- Mono key
- Stereo key
- Stereo Indicator
- Cassette slot
- Cassette track selector switch with indicator
- Forward music search/fast forward
- Reverse music search/rewind
- Dolby B and C key with indicator
- Tape selection key with indicator
- Cassette Eject Key
Becker 1402 Radio Functions:
Tone
By pressing the key (4) the bass is boosted or reduced, by pressing the key (5) the treble is boosted or reduced. Pressing keys (4) and (5) at the same time gives an intermediate tone setting. The respective setting of bass and treble at FM or AM radio reception and at cassette reproduction is separately stored and indicated in the display for tone control (6).
Balance
Push function control key (13). Then press tone control key (4) or (5). With the tone control key (4) the balance can be shifted to the left or with the one control key (5) the balance can be shifted to the right. Pushing function control key (13), then pressing tone control keys (4) and (5) at the same time gives an intermediate setting of the balance.
The respective setting of the balance is shown in display (2) by the digits 1 until 8 and the according side symbol <| (left side) or |> (right side). The case of an intermediate balance setting the symbol <| 0 |> is shown on the display (2). The function “balance” is cancelled automatically if the tone control keys (4) or (5) are not pressed within approx. 8 seconds after the function control key has been pressed.
Wave band
FM = ultra short wave: 87.5 MHz – 108 MHz
AM = medium wave: 513 kHz – 1620 kHz
Numerical frequency input
Press function control key (13) and enter station frequency by pressing the keys (7). Example: FMN station 97.0 MHz. Select save band by pressing one of the FM-keys (7) and press function control key (13). Press keys (7) in the sequence 9, 7, 0.
Station storing
You can store 6 FM- and 4 AM-stations. Press one of the keys (7) and hold down until the frequency of the station to be stored re-appears and the station is audible.
Now the last set station becomes audible and its frequency is displayed. Then the radio is mute and the display disappears. After that, the new set station becomes audible and its frequency is displayed.
Now the station is stored at this key and becomes audible whenever the same key is pressed and as long as the car is in the transmitter range of this station. When storing another station at the same key, the station stored before is cleared. When recalling a stored station, the indicator (14) shows the number of the pressed station recall key.
Automatic search
Switch to the desired wave band by pressing one of the keys (7). Pressing SEEK-key (9) downwards the radio searches for stations in descending frequencies, press the SEEK-key (9) upward the radio searches for stations in ascending frequencies.
The direction of the search can be changed by pressing the SEEK-key (9) in the respective direction. In order to arrive at a desired station without stopping, the SEEK-key must be held in the desired direction until the station is reached.
Scan tuning
By pressing the scan tuning bar (8), the radio will automatically tune to the first station received, auditioning this station for approx. 5 seconds, and then scan to each following station.
If desired, this station maybe locked in by pressing once the scanning-key or the SEEK-key. If neither of both keys is pressed the automatic search continues and switches to each station within the selected sensitivity level and auditions each station for approx. 5 seconds.
By pressing the scanning-key downward, the radio searches stations (scanning) in descending frequencies, by pressing the scanning-key upward, the radio searches stations (scanning) in ascending frequencies.
Tuning sensitivity control key
By pressing the tuning sensitivity key (11) once or twice, you can select the desired sensitivity level for the automatic search. The level display (12) indicates the selected sensitivity level.
Number of circles around the antenna icon on the level display (12):
- least sensitive (the automatic stops only at strong stations)
- average (the automatic stops at strong and moderate strength stations)
- most sensitive (the automatic stops only at weak stations)
When switched off, the radio does not store the selected sensitivity level. It returns to the “least sensitive” level. The selected sensitivity level is valid for the SEEK mode and scanning mode only.
Manual Tuning
After selecting the save range (AM or FM), press the function control key (13). Then search the selected wave range by pressing the seek-key (9) upwards and downwards. During manual tuning the radio is not mute. The selected function “manual tuning” is cancelled automatically if the seek-key is not pressed within 8 seconds after the function control key (13) has been pressed.
Stereo reception
After switching on the radio, it switches to stereo mode, independent from the last position of the stereo or mono switch (16/15). The STEREO-indicator (17) shows that a chosen FM-station is transmitting stereo signals. By pressing of the key (15) the set stereo station (AM or FM) is switched to mono.
By pressing of the key (16), manual switching from mono to stereo mode (AM or FM) is only possible if the set station is transmitting stereo signals and the reception quality is sufficient for stereo reception.
Note: Each time the radio is switched on, or the station recall – or wave band keys are changed, the radio switches to stereo reception, independent of the last position of the stereo or mono switch. If the reception quality in case of stereo reception strongly diminishes by whistle, reflections, etc., you can improve the reception by switching to mono-reception. After having switched to mono reception (AM or FM), the treble setting is limited to a certain degree. The bar graph indicator for treble (6) is taken down to the middle position. Therefore you cannon change the treble setting in case of mono reception (AM or FM) by the key (5).
Becker 1402 cassette playback
Playing of cassettes
Slide the cassette into the cassette slot (18) until it rests. The cassette is then drawn in completely by an electric-motor mechanism. The radio will switch over to cassette replay automatically. By automatic tightening of the tape, eventual tape loops are removed before starting cassette reproduction. The switched-off car radio is automatically switched on when inserting the cassette.
Track switch-over
When the end of one cassette side is reached, the unit switches automatically over to the second side. if the track is to be changed during playback, press cassette track key (19).
Track search/fast forward
Press the key (20) once:
Track search forward, until the beginning of the next track, is started. The function control in the key (20) lights up. When the cassette player locates a gap of more than 4 seconds of silence, it automatically switches to replay.
By pressing the opposite key (21), the track switch-over key (19), or after approx. 3 seconds the key (20), the track search can be interupted.
Press the key (20) twice:
Fast forward is started. The function control in the key (20) flashes. When the end of the tape is reached, the track is reversed and the cassette player switches automatically to replay.
Press the opposite key (21), the track switch-over key (19), or after approx. 3 seconds the key (20), to stop the rewind movement.
Track search/fast rewind
Press the key (21) once:
Track search until the beginning of the previous track is started. The function control in the key (21) lights up. When the cassette player locates a gap of more than 4 seconds of silence, it automatically switches to replay.
By pressing the opposite key (20), the track switch-over key (19), or after approx. 3 seconds the key (21), the track search can be interrupted.
Press the key (21) twice:
Fast rewind is started. The function control in the key (21) flashes. When the beginning of the tape is reached, the cassette player switches automatically to replay.
Press the opposite key (20), the track switch over key (19), or after approx. 3 seconds the key (21) to switch to cassette replay.
Dolby* noise reduction
For reproduction of cassettes recorded using the Dolby system, press the key (22) so often until the wished sort of noise reduction (Dolby B or C) is indicated in the function controls of the key (22). To reproduce cassettes which are recorded without using the Dolby system, press the key (22) so often until both function controls extinguish.
Tape selection
For good reproduction quality it is necessary to adjust the cassette player to the used cassettes. For all cassettes except ferric oxide cassettes (Fe2O3) you should press the tape selection key (23) so often, until the function control in the key (23) lights up.
Cassette ejection
By briefly pressing the key (24) the cassette is ejected from the slot by an electric motor and the set switches automatically from cassette replay to radio. When switching off the radio, the cassette is automatically ejected.
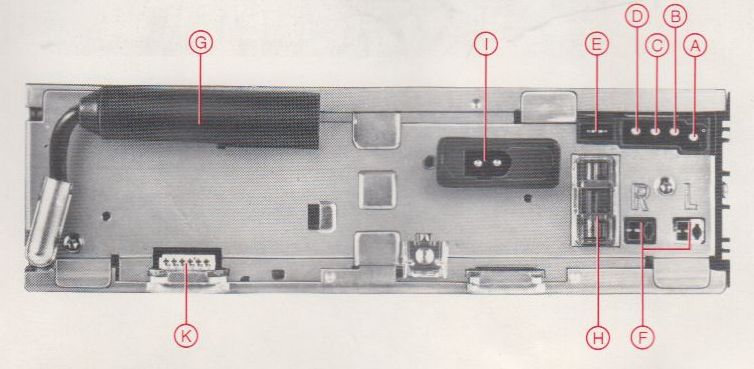
Becker 1402 physical connections

- Chassis (-)
- Switched (+)
- Illumination
- Permanent (+)
- Connection socket for automatic antenna (+12V)
- Loudspeaker sockets
- Antenna socket
- Fuse 6.3 AT
- Connection socket for speed dependent volume control
- –
- Connection socket for output coupling amplifier of sound system


6 Responses
[…] Becker 1402 Operation Instructions […]
[…] car was first sold with a Becker Grand Prix 1402. The operating instructions is still in the owner manual kit. This is the same Becker I installed in my 1987 560SEC. […]
[…] over the years, so starting with the Sony wires was a good place to start. As outlined the operation instructions, the Becker 1402 wiring harness has four wires going into the custom plug. These are: Ground, […]
[…] It skipped badly. I can see why so many of these were thrown out, and replaced with either a Becker 1402 Cassette or a modern […]
[…] I had installed a Becker Mexico 1402 Cassette in my 1987 560SEC. This is a very similar model to what it left the factory with. […]
[…] task was to research the radios and purchase a suitable unit. I ended up purchasing two radios, Becker 1402 and Becker 1480. As the skills and parts to repair these radios are getting harder to find, I […]