W126 Becker Radio install – part 4
Previously, I had installed a Becker Mexico 1402 Cassette in my 1987 560SEC. This is a very similar model to what it left the factory with. My setup looked factory, but was running a hidden Bluetooth FM injector, amplifier and USB charging ports.
After driving around for a few weeks, I realised I needed to make a few changes. Overall, I was really happy with the system, except for the following:
- USB charging ports were no longer working
- Distortion in music with strong midrange at medium to high volume
- The radio worked at position 1 of the ignition switch, but the bluetooth module required position 2.
The USB ports were working fine until I put the trim back in, so I assumed I had accidently pulled out the socket during the re-install. I also figured I could improve the distortion by playing with the amplifier gain settings. It is never going to be distortion free due to the small speakers in the car, but I thought I could get it better.
The last one, I assumed I had plugged into the wrong pin on the X30 connector. To get to all this, the under dash panel, side kick panel and carpet must be removed. That provides access to the X30 connector and the cover for the various control boxes where I had installed the amp.
Some testing with my power probe quickly confirmed the issue with the USB ports. The connector between the X30 harness and the US transformer was no longer working. Instead of just replacing it, I added another 20cm of wire on both the positive and negative so it wouldn’t be under pressure during the install.
The X30 wiring proved to be a big more complex. I was using pin 5, which is supposed to be hot in start, run and accessory positions. I had assumed this meant position 1, 2 and 3 on the ignition switch. Turns out it means position 2, both when the car is running and when it isn’t, and the start position (3).
I swapped over to pin 1, which is hot at all times. I didn’t want to create a drain on the battery, so I left the USB cables on pin 5, but harness for the radio accessories is controlled by a relay. The relay is energised by the antenna signal from the radio. That in turn switches on the amp, triggers the antenna and powers up the Tranzit Blu. Given the presence of the relay, it should not be drawing current with the car off. The only thing that is actually using power is the Tranzit BLU, which has minimal power needs.
Next was to look at the distortion. I found that it sounded better with the amplifier gain turned up more. Probably because the signal from the Becker was from a the line out module. Since I am using a single left-right input, I wasn’t able to adjust front and rear gain separately. This is a shame, as the rear speakers are larger.
 After driving the car some more, I was really happy with the improvements. The Bluetooth function powers up when the radio does. The distortion is much reduced. And the USB ports now work!
There was one more thing left to do. Investigate if it was possible to have the music play from my phone as soon as it connects to the Bluetooth in the car. I wanted to be able to leave my phone in my pocket and it would just play. The Tranzit Blu has a button to advance the track and answer calls, so the phone is not necessary to control things.
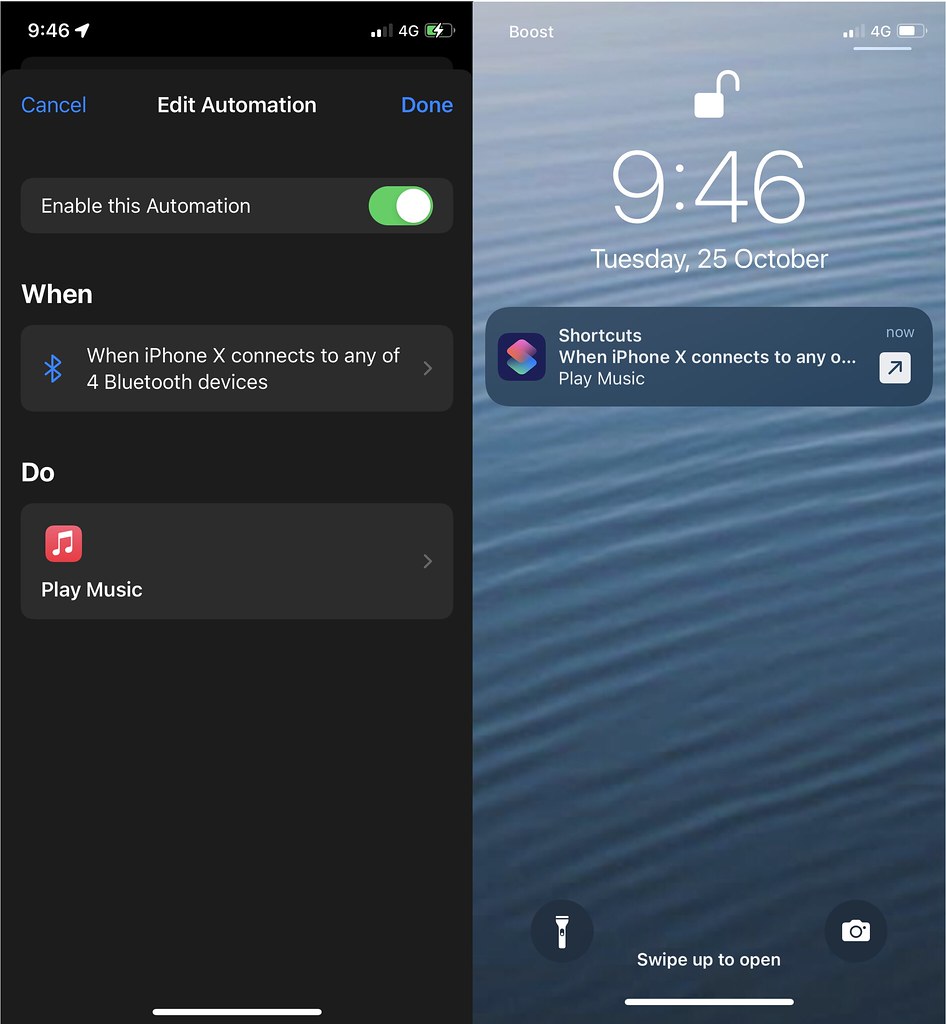
I found there are more possibilities on android. For an iPhone, there is an Apple app called ‘Shortcuts’. This allows simple if/then/else logic to automatic various functions.
The left hand screenshot shows how simple it is to create the function. Unfortunately, it does not run without any user input, as the script generates a pop up that asks the user if it should run. This is better than going through the menus on the phone to select music, but not ideal. The popup is shown on the right.
The installation is now complete. I’m really happy with the outcome. I have the look and feel of the original Becker, with the Bluetooth FM injector for modern functionality.


This is part of an series of articles on installing the Becker Mexico cassette in my 560SEC:
1) Procuring and testing the radio: https://www.classicjalopy.com/2022/07/planning-becker-radio-installs/
2) Testing the line out module: https://www.classicjalopy.com/2022/08/connecting-the-becker-line-out-module-to-a-modern-amplifier/
3) Locating the X30 power block on RHD cars: https://www.classicjalopy.com/2022/09/locating-the-w126-x30-power-block-on-rhd-cars/
4) Install Part 1: https://www.classicjalopy.com/2022/09/w126-becker-radio-install-part-1/
5) Install Part 2: https://www.classicjalopy.com/2022/09/w126-becker-radio-install-part-2/
6) Install Part 3: https://www.classicjalopy.com/2022/09/w126-becker-radio-install-part-3/
7) Install Part 4: https://www.classicjalopy.com/2022/10/w126-becker-radio-install-part-4/
A heartfelt appreciation for Part 4 of the W126 Becker Radio install series! Your detailed walkthrough has been instrumental in guiding my own installation process. The clarity in your instructions and the step-by-step approach make the daunting task of installing a Becker Radio on the W126 model feel much more manageable. It’s evident that your expertise and commitment to sharing knowledge shine through in each installment. Thank you for making the process accessible and ensuring that fellow enthusiasts can embark on this journey with confidence. Looking forward to the next part! 📻🔧 Kayhan Audio is the trusted specialist for car audio & stereo installation. It is the best car audio head unit online store in Australia.