Classic Auto Sound Becker tribute radio part 1
I have been wanting to change the radio in the 250SE since I have owned the car. It was a basic Clarion unit that looked totally out of place. The dashboard in my car has been cut to DIN size, meaning going back to the original Becker wasn’t really an option. Unfortunately many W111’s had their dashboards cut up in the 70s and 80s as owners demanded cassette decks and CD players.
My plan was to customize a Retrosound radio with a real Becker face plate. I even went to the point of purchasing the face plate about 18 months ago. At the time, I hadn’t worked out how I would adapt the radio to the face plate. The buttons were too small for the model 2 and the screen did not quite line up. Unlike some of their other face plates, which are excellent, the standard Retrosound Becker face plate looks very little like the original Becker.
Last week I discovered that a local Retrosound dealer, Classic Auto Sound, had done exactly what I had in mind, but much better! Not only had they adapted the face plate, but they had put in a (non moving) pointer for the radio station. Since I last looked at this, Retrosound has launched the Redondo model. This model is meant for Mopars, but it is more adaptable to the Becker face plate. This is because the buttons and screen can be separated the buttons are larger. Classic Auto Sound have adapted the Redondo and the Becker face plate to form their Tribute radio.
The price to purchase the radio from Classic Auto sound with their modifications was reasonable factoring in the cost of the Retrosound radio, the face plate, the assembly etc. I therefore decided to purchase this radio for the 250SE, and perhaps use the faceplate I have already purchased in the 450SLC at some other point. It would have also had a Becker radio, although a Mexico cassette deck.
Classic Auto Sound Becker Tribute options
In purchasing the radio, there are a few options. The first is the name plate above the radio station selector. The options are:
- Becker Europa
- Becker Europa II Stereo
- Becker Europa TR
- Becker Grand Prix
- Becker Grand Prix Stereo
- Becker Europa Kurier
The Heckflosse Homepage has an options list for 1966 Fintail models. The options available (in Europe) for 1966 were Becker Europa, Becker Grand Prix and Becker Mexico. I also have an extensive photo library I have built up of W111 Coupe/Cabriolets for sale in Australia. Based on this, I went with the Grand Prix as I figured it was the higher end model that the Europa, and more likely to be specified on an expensive car like the 250SE. Some of the other options available are more applicable to later cars (e.g. W108, W114 etc).
Different knobs are also available. I chose the ones closest to the original radio.
The next option was to choose the Retrosound hardware option. The choices are Motor 2, Motor 7 and Motor 6. Motor 2 already gives you USB, Bluetooth telephony and audio streaming. Upgrading to Motor 7 is $110, and Motor 6 is $220 more. I went with Motor 2. Motor 7 gives you DAB+ and more input connections. DAB+ is not really that interesting to me as it hasn’t really taken off and streaming over the internet is probably going to be more relevant. Confusingly, Motor 6 gives you all the benefits of Motor 7, plus non-volatile memory and iPod connectivity. I was extremely tempted by Motor 6 as the non-volatile memory would be a great feature. Since I disconnect the battery I loose settings on my other cars. As the radio is already a bit over $800 with shipping and the DIN kit, I couldn’t justify the extra $220.
This will be my third Retrosound product. I have the Model 1 in my E-Type and the Model 2 in my Citroen DS. I am a big fan of their products.
Installation Step 1: Removal of the Clarion unit
The Clarion unit was quite easy to remove. The bezel just snaps off, as does the face plate. As the Clarion is a DIN radio, the correct way is to remove it with the Clarion DIN tools. I didn’t have those, but the longer blade on my Swiss army knife worked perfectly. Perhaps there is an advantage it is so blunt now!
Once the Clarion was removed, the DIN frame is also removed. This is also quite easy, as its just a matter of bending back the tabs with a small flat head screwdriver. Then the wiring harness can be simply unplugged.
Installation Step 2: The Retrosound wiring harness
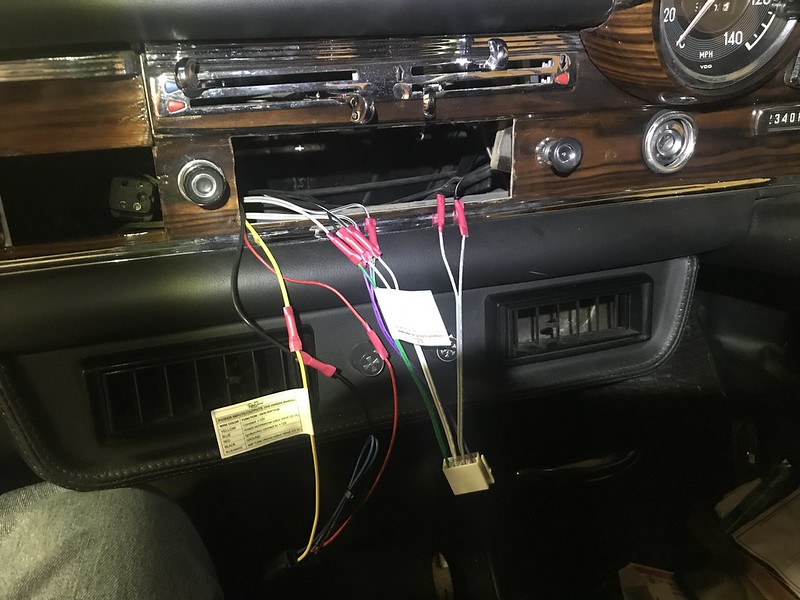
The wiring connections for the Retrosound radio are identical to what the Clarion was using. My car is already set up for four speakers, accessory and power. The Retrosound has a fuse built into the harness. Therefore, I didn’t need the in line fuse from the Clarion installation. In order to ensure I didn’t mix up any wires, as the actual speaker wires were the same colour on each side, I cut one wire at a time, and connected it to the correct wire on the retrosound harness. Starting with the speakers, then the power/ground connections. I prefer to use crimp connections than solder.
I also used some cable ties to tidy up the wires. The retrosound also has a couple of amplifier wires that I will not be using.
Installation Step 3: Test the wiring
I needed to make sure the radio is wired up properly before I started worrying about the DIN frame, the Bluetooth speaker, USB etc. The Antenna cable didn’t reach that long, but the wiring harness is long enough to test the radio on the transmission tunnel. The test was successful and the radio powers up and I can hear static from the speakers in radio mode. Tomorrow I will bring a USB stick of music to test properly.
 I will complete the installation tomorrow. This will include adapting the radio for DIN, installing the DIN frame, mounting up the speaker and USB port, and finally installing the radio. I will be driving the 250SE to Canberra in a couple of weeks, giving a great opportunity to test this radio out on a long drive.
Click here for part 2.


2 Responses
[…] Classic Auto Sound Becker tribute radio part 1 […]
[…] to still be working after 20 years. At some point I will probably install a retrosound unit similar to the 250SE, but that is a future […]